Home made bread (Pane casereccio)
This recipe for home made bread is the one I use the most, especially when I am in a hurry and need to make bread for the family. Forget the long hours fermentation process, like for the sourdough bread or bread prepared with a pre-ferment (i.e. biga, poolish & Co.); here I am using the “straight dough method” with a bit of autolyse at the very start of the process. If you are not a seasoned home baker and you are feeling an headache because of words like “straight dough method” or “autolyse”, don’t worry....just follow the recipe directions and forget about the words; in just 4 hours you will have a fantastic bread loaf, characterised by flavour, good colour and a lovely open texture.However, if you want to know more about the two techniques I have applied for this recipe, I suggest you Google the following:Straight dough methodAutolyse, Raymond CalvelThat’s all you need to know!!Now, let’s start with the recipe.Before you start, be sure you also have a baking stone, a bread proving basket (1 Kg capacity) and a bread/pizza peel for domestic ovens. The bread proving basket will need a handful of rye/wholewheat flour and the bread/pizza peel will need a handful of coarse semolina (read the recipe directions and you will see why).
Ingredients
- 500 grams (1.1 lb) Canadian strong white bread flour (12.6 % protein content) bp 100% if you cannot find the Canadian strong white flour specified above, look for any strong white bread flour with protein content between 12.5% and 14%. If the protein content of your flour is closer to 14% than to 12.5%, then I suggest you use 15 g (1tbs) of extra water.
- 370 grams (13 fl oz) Water (tepid) bp 74%
- 12 grams (1/2 oz) Fresh yeast bp 2.4% (use only 9 g if in the summer, with hot weather) fresh yeast is also called baker’s yeast.
- 10 grams (1 tablespoon) Fine sea salt bp 2%
- 5 grams (1 tablespoon) Diastatic malt flour (optional) bp 1% if you cannot find the diastatic malt flour, try malt extract instead.
Instructions
- Place the flour into the bowl of your mixer (I have used a Kenwood mixer).

- Add all the water.

- Mix for 1 minute at speed 1.

- After 1 minute mixing, you should have a sticky irregular mass of just flour and water.

- Switch off the mixer and place the plastic cover that comes with it on top of the bowl. Alternatively, remove the bowl and cover its top with cling film. Leave the mixture to rest for 30 minutes (this stage is called autolyse). Meanwhile, do something else and if you have to leave the mixture for 40 minutes or so, don’t worry, it will be fine!

- After the rest (autolyse), add the diastatic malt flour into the bowl.

- Mix for 5 minutes at speed 2.

- During this 5 minutes mixing, you need to add the yeast (crumbled) and the salt. Add the yeast 30 seconds after you have started the mixer and add the salt 3 minutes after you have started the mixer (the salt is the last to be added).

- Here is the dough after the 5 minutes mixing has been completed.

- Transfer the dough onto a lightly floured working surface.

- Shape the dough into a ball.

- Put the dough into a large bowl, cover with cling film, and leave for 2 1/2 hours in a warm room (this stage is called bulk fermentation). During this time, you need to take the dough out of the bowl, twice, after the first hour and the second hour, for a process called folding. Folding is absolutely important; it’s the real secret for a good bread, so follow the next directions to the letter.

- Here is the dough after 1 hour fermentation. It is now time for the first folding.

- Transfer the dough onto a lightly floured working surface. The side of the dough that was facing downwards, when inside the bowl, should point upwards when transferred onto the working surface. Roughly shape the dough like a rectangle, without pressing or squeezing it too much (you want to retain most of the carbon dioxide that has formed inside the dough during the fermentation).

- Fold the right side (one third) over the centre, as shown in the picture. Again, do this gently, without pressing or squeezing the dough too much. Be careful to not incorporate extra flour within the folds; use a soft brush to remove any excess flour.

- Fold the left side (one third) over the centre, overlapping the right side third, as shown in the picture.

- Now, turn the dough so that you are facing the longer side.

- Repeat the folding; one third over the centre.

- Fold the opposite third so that it overlaps the first third.

- Put the dough back in the bowl, with the seam facing the bottom of the bowl, and leave to ferment for another hour. At the second hour, repeat the folding process once more and leave to ferment for a final 1/2 hour.

- Once the final 1/2 hour has passed, you will have completed the 2 1/2 hours bulk fermentation stage. Transfer the dough onto a lightly floured working surface. Again, the side of the dough that was facing downwards when inside the bowl, should point upwards when placed onto the working surface. The dough will be very soft to the touch and will have a light appearance.Shape the dough like a ball, without pressing or squeezing it too much (you want to retain most of the carbon dioxide that has formed inside the dough during the fermentation).To make a ball, turn the dough over and with both hands rotate the dough while applying gentle pressure to the base, as if tucking the dough underneath.

- If the above instruction has been carried out correctly, you should end up with a ball like this one. Leave the shaped dough aside for a moment.

- This proving basket is called “wicker basket”. Spread and pat some flour (use rye or wholewheat flour for this job) all over its wall and base, so that the flour entirely coats the internal liner. Be generous with the flour otherwise the dough will stick to the basket, compromising the final result.

- Lift your loaf and put it inside the proving basket, with the top smooth side facing the bottom of the basket.

- Cover the basket with a cloth. Let the dough to rise for about 45-60 minutes in a warm room (this stage is called final rising).

- One hour before the baking, place the baking stone inside the oven and switch the oven on. Set the oven to 230°C - 450°F (my oven is fan assisted). About 10 minutes before putting the bread into the oven, you need to create some steam inside the oven. I personally spray the water (4 or 5 times) against the oven wall, but if you are concerned about this method because you may damage your oven fan or electrics in general, here is another method: at the very start, when you switch the oven on, leave a small metal tray in the bottom of the oven. About 10 minutes before putting the bread into the oven, throw 2 or 3 ice cubes over the little tray and close the oven door quickly.

- The picture shows the loaf after 45 minutes final raising.

- Spread some semolina or polenta flour onto the peel and carefully turn the proving basket over the peel. Your loaf should fall out of the basket and over the peel, with the nice side up.

- With a grignette or a razor-blade (don’t use an ordinary kitchen knife) slash the top surface of the loaf.

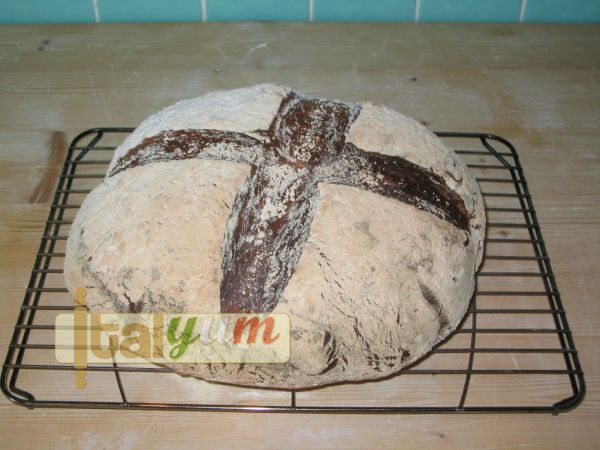
- Slash the top, with a steady hand. I usually make a cross pattern but you are free to apply any pattern you wish.

- Place the loaf into the oven. At this stage I usually spray the oven walls with another 3 or 4 sprays and quickly close the oven door. If you are using the metal tray method, to generate steam, then add a couple of ice cubes. Bake your loaf for about 40 minutes.

- This is the bread ready, after 40 minutes.

- Leave the bread to cool down over a wire rack for at least a couple of hours.

- Then, you can cut your loaf and do whatever you want with it.

- This type of bread is the perfect all-rounder for your day to day meals and it is the ideal choice for bruschettas.

Notes
Buon appetito!
Federico Pezzaioli
Nutrition
Calories: 120kcal
Tried this recipe?Let us know how it was!